클러스터를 먼저 프로비저닝 했다. 30분이상이 걸리는 작업이므로 시작해놓고 기다린다.
eksctl create cluster --vpc-public-subnets $WKSubnets --name $CLUSTER_NAME --region $AWS_REGION --version 1.21 \
> --nodegroup-name $CLUSTER_NAME-nodegroup --node-type t3.medium --nodes 3 --nodes-min 3 --nodes-max 6 \
> --with-oidc --node-volume-size=20 --ssh-access --ssh-public-key $MySSHKeypair
2021-09-04 11:29:11 [ℹ]  eksctl version 0.63.0
2021-09-04 11:29:11 [ℹ]  using region ap-northeast-2
2021-09-04 11:29:12 [✔]  using existing VPC (vpc-094808933b68add7c) and subnets (private:map[] public:map[ap-northeast-2a:{subnet-0a603a222db0cce10 ap-northeast-2a 10.0.11.0/24} ap-northeast-2b:{subnet-007964ce4a003361a ap-northeast-2b 10.0.12.0/24} ap-northeast-2c:{subnet-007813cf58631ef3b ap-northeast-2c 10.0.13.0/24}])
2021-09-04 11:29:12 [!]  custom VPC/subnets will be used; if resulting cluster doesn't function as expected, make sure to review the configuration of VPC/subnets
2021-09-04 11:29:12 [ℹ]  nodegroup "first-eks-nodegroup" will use "" [AmazonLinux2/1.21]
2021-09-04 11:29:12 [ℹ]  using EC2 key pair %!q(*string=<nil>)
2021-09-04 11:29:12 [ℹ]  using Kubernetes version 1.21
2021-09-04 11:29:12 [ℹ]  creating EKS cluster "first-eks" in "ap-northeast-2" region with managed nodes
2021-09-04 11:29:12 [ℹ]  will create 2 separate CloudFormation stacks for cluster itself and the initial managed nodegroup
2021-09-04 11:29:12 [ℹ]  if you encounter any issues, check CloudFormation console or try 'eksctl utils describe-stacks --region=ap-northeast-2 --cluster=first-eks'
2021-09-04 11:29:12 [ℹ]  CloudWatch logging will not be enabled for cluster "first-eks" in "ap-northeast-2"
2021-09-04 11:29:12 [ℹ]  you can enable it with 'eksctl utils update-cluster-logging --enable-types={SPECIFY-YOUR-LOG-TYPES-HERE (e.g. all)} --region=ap-northeast-2 --cluster=first-eks'
2021-09-04 11:29:12 [ℹ]  Kubernetes API endpoint access will use default of {publicAccess=true, privateAccess=false} for cluster "first-eks" in "ap-northeast-2"
2021-09-04 11:29:12 [ℹ]  2 sequential tasks: { create cluster control plane "first-eks", 3 sequential sub-tasks: { 4 sequential sub-tasks: { wait for control plane to become ready, associate IAM OIDC provider, 2 sequential sub-tasks: { create IAM role for serviceaccount "kube-system/aws-node", create serviceaccount "kube-system/aws-node" }, restart daemonset "kube-system/aws-node" }, 1 task: { create addons }, create managed nodegroup "first-eks-nodegroup" } }
2021-09-04 11:29:12 [ℹ]  building cluster stack "eksctl-first-eks-cluster"
2021-09-04 11:29:12 [ℹ]  deploying stack "eksctl-first-eks-cluster"
2021-09-04 11:29:42 [ℹ]  waiting for CloudFormation stack "eksctl-first-eks-cluster"
2021-09-04 11:30:12 [ℹ]  waiting for CloudFormation stack "eksctl-first-eks-cluster"
2021-09-04 11:31:12 [ℹ]  waiting for CloudFormation stack "eksctl-first-eks-cluster"
2021-09-04 11:32:12 [ℹ]  waiting for CloudFormation stack "eksctl-first-eks-cluster"
2021-09-04 11:33:12 [ℹ]  waiting for CloudFormation stack "eksctl-first-eks-cluster"
2021-09-04 11:34:12 [ℹ]  waiting for CloudFormation stack "eksctl-first-eks-cluster"
2021-09-04 11:35:12 [ℹ]  waiting for CloudFormation stack "eksctl-first-eks-cluster"
2021-09-04 11:36:12 [ℹ]  waiting for CloudFormation stack "eksctl-first-eks-cluster"
2021-09-04 11:37:12 [ℹ]  waiting for CloudFormation stack "eksctl-first-eks-cluster"
2021-09-04 11:38:12 [ℹ]  waiting for CloudFormation stack "eksctl-first-eks-cluster"
2021-09-04 11:39:12 [ℹ]  waiting for CloudFormation stack "eksctl-first-eks-cluster"
2021-09-04 11:40:13 [ℹ]  waiting for CloudFormation stack "eksctl-first-eks-cluster"
2021-09-04 11:41:13 [ℹ]  waiting for CloudFormation stack "eksctl-first-eks-cluster"
2021-09-04 11:45:14 [ℹ]  building iamserviceaccount stack "eksctl-first-eks-addon-iamserviceaccount-kube-system-aws-node"
2021-09-04 11:45:14 [ℹ]  deploying stack "eksctl-first-eks-addon-iamserviceaccount-kube-system-aws-node"
EKS를 Setup 하는 과정에 대해선 이전포스팅을 참고하기 바란다.
간단한 실습이 있지만..음 istio는 못참지.
가즈아!
먼저 istioctl을 설치하자.
curl -L https://istio.io/downloadIstio | ISTIO_VERSION=1.10.4 TARGET_ARCH=x86_64 sh -
tree istio-1.10.4/ -L 2
mv istio-1.10.4/bin/istioctl /usr/local/bin/istioctl
istioctl version
버전과 상황에 따라 설치 방법이 다를 수 있다.
istioctl install --set profile=demo -y
demo로 프로파일을 설정하게되면 istio에서 사용하는 모든 오브젝트를 설치해준다. 그러므로 만약 프로덕션에서 사용한다면 원하는 오브젝트만 따로 설치하자.
nginx pod에 istio inject 명령어로 yaml 에 istio를 주입하면 이렇게 된다.
#전
apiVersion: v1
kind: Pod
metadata:
  name: pod1
spec:
  containers:
  - name: nginx
    image: nginx
    ports:
    - containerPort: 80
#후
istioctl kube-inject -f pod1.yaml
apiVersion: v1
kind: Pod
metadata:
  annotations:
    kubectl.kubernetes.io/default-container: nginx
    kubectl.kubernetes.io/default-logs-container: nginx
    prometheus.io/path: /stats/prometheus
    prometheus.io/port: "15020"
    prometheus.io/scrape: "true"
    sidecar.istio.io/status: '{"initContainers":["istio-init"],"containers":["istio-proxy"],"volumes":["istio-envoy","istio-data","istio-podinfo","istio-token","istiod-ca-cert"],"imagePullSecrets":null}'
  creationTimestamp: null
  labels:
    istio.io/rev: default
    security.istio.io/tlsMode: istio
    service.istio.io/canonical-name: pod1
    service.istio.io/canonical-revision: latest
  name: pod1
spec:
  containers:
  - image: nginx
    name: nginx
    ports:
    - containerPort: 80
    resources: {}
  - args:
    - proxy
    - sidecar
    - --domain
    - $(POD_NAMESPACE).svc.cluster.local
    - --serviceCluster
    - pod1.default
    - --proxyLogLevel=warning
    - --proxyComponentLogLevel=misc:error
    - --log_output_level=default:info
    - --concurrency
    - "2"
    env:
    - name: JWT_POLICY
      value: third-party-jwt
    - name: PILOT_CERT_PROVIDER
      value: istiod
    - name: CA_ADDR
      value: istiod.istio-system.svc:15012
    - name: POD_NAME
      valueFrom:
        fieldRef:
          fieldPath: metadata.name
    - name: POD_NAMESPACE
      valueFrom:
        fieldRef:
          fieldPath: metadata.namespace
    - name: INSTANCE_IP
      valueFrom:
        fieldRef:
          fieldPath: status.podIP
    - name: SERVICE_ACCOUNT
      valueFrom:
        fieldRef:
          fieldPath: spec.serviceAccountName
    - name: HOST_IP
      valueFrom:
        fieldRef:
          fieldPath: status.hostIP
    - name: CANONICAL_SERVICE
      valueFrom:
        fieldRef:
          fieldPath: metadata.labels['service.istio.io/canonical-name']
    - name: CANONICAL_REVISION
      valueFrom:
        fieldRef:
          fieldPath: metadata.labels['service.istio.io/canonical-revision']
    - name: PROXY_CONFIG
      value: |
        {}
    - name: ISTIO_META_POD_PORTS
      value: |-
        [
            {"containerPort":80}
        ]
    - name: ISTIO_META_APP_CONTAINERS
      value: nginx
    - name: ISTIO_META_CLUSTER_ID
      value: Kubernetes
    - name: ISTIO_META_INTERCEPTION_MODE
      value: REDIRECT
    - name: ISTIO_META_WORKLOAD_NAME
      value: pod1
    - name: ISTIO_META_OWNER
      value: kubernetes://apis/v1/namespaces/default/pods/pod1
    - name: ISTIO_META_MESH_ID
      value: cluster.local
    - name: TRUST_DOMAIN
      value: cluster.local
    image: docker.io/istio/proxyv2:1.10.4
    name: istio-proxy
    ports:
    - containerPort: 15090
      name: http-envoy-prom
      protocol: TCP
    readinessProbe:
      failureThreshold: 30
      httpGet:
        path: /healthz/ready
        port: 15021
      initialDelaySeconds: 1
      periodSeconds: 2
      timeoutSeconds: 3
    resources:
      limits:
        cpu: "2"
        memory: 1Gi
      requests:
        cpu: 10m
        memory: 40Mi
    securityContext:
      allowPrivilegeEscalation: false
      capabilities:
        drop:
        - ALL
      privileged: false
      readOnlyRootFilesystem: true
      runAsGroup: 1337
      runAsNonRoot: true
      runAsUser: 1337
    volumeMounts:
    - mountPath: /var/run/secrets/istio
      name: istiod-ca-cert
    - mountPath: /var/lib/istio/data
      name: istio-data
    - mountPath: /etc/istio/proxy
      name: istio-envoy
    - mountPath: /var/run/secrets/tokens
      name: istio-token
    - mountPath: /etc/istio/pod
      name: istio-podinfo
  initContainers:
  - args:
    - istio-iptables
    - -p
    - "15001"
    - -z
    - "15006"
    - -u
    - "1337"
    - -m
    - REDIRECT
    - -i
    - '*'
    - -x
    - ""
    - -b
    - '*'
    - -d
    - 15090,15021,15020
    image: docker.io/istio/proxyv2:1.10.4
    name: istio-init
    resources:
      limits:
        cpu: "2"
        memory: 1Gi
      requests:
        cpu: 10m
        memory: 40Mi
    securityContext:
      allowPrivilegeEscalation: false
      capabilities:
        add:
        - NET_ADMIN
        - NET_RAW
        drop:
        - ALL
      privileged: false
      readOnlyRootFilesystem: false
      runAsGroup: 0
      runAsNonRoot: false
      runAsUser: 0
  volumes:
  - emptyDir:
      medium: Memory
    name: istio-envoy
  - emptyDir: {}
    name: istio-data
  - downwardAPI:
      items:
      - fieldRef:
          fieldPath: metadata.labels
        path: labels
      - fieldRef:
          fieldPath: metadata.annotations
        path: annotations
      - path: cpu-limit
        resourceFieldRef:
          containerName: istio-proxy
          divisor: 1m
          resource: limits.cpu
      - path: cpu-request
        resourceFieldRef:
          containerName: istio-proxy
          divisor: 1m
          resource: requests.cpu
    name: istio-podinfo
  - name: istio-token
    projected:
      sources:
      - serviceAccountToken:
          audience: istio-ca
          expirationSeconds: 43200
          path: istio-token
  - configMap:
      name: istio-ca-root-cert
    name: istiod-ca-cert
status: {}
---
istio의 sidecar가 nginx pod에 삽입되게 된다.
      limits:
        cpu: "2"
        memory: 1Gi
      requests:
        cpu: 10m
        memory: 40Mi
사용하는 자원의 제한은 위와같다. istio-init(initcontainer) proxy(envoy) 가 추가된다.
kubectl label namespace default istio-injection=enabled
namespace/default labeled
kubectl get ns -L istio-injection
NAME              STATUS   AGE   ISTIO-INJECTION
default           Active   46m   enabled
namespace 에 라벨을 붙이면 자동으로 그뒤론 NS 에 sidecar가 붙게된다.
k run nginx-istio --image=nginx --restart=Never
pod/nginx-istio created
k get pod
NAME          READY   STATUS            RESTARTS   AGE
nginx-istio   0/2     PodInitializing   0          4s
pod1          2/2     Running           0          5m11s
이제 sidecar를 본격적으로 확인해보자.
kubectl apply -f istio-1.10.4/samples/addons
아까 다운로드한 istio 에서 샘플로제공된 애드온을 설치한다. 위와같은 명령어를 치면 모든 애드온이 설치된다. 애드온내부에 있는 특정 애드온만도 설치가능하니 필요하면 특정 애드온만 설치해도 된다.
kiali.yaml 를 설치할때 kind 에 MonitoringDashboard 가 있어야 설치가 되는데 처음에 한꺼번에 다 배포를 하면 실패한다 그럼 그냥 쿨하게 명령어 한번더 입력해주자.
이제 애드온으로 접근하기위해선 애드온의 서비스를 퍼블릭하게 변경해줘야하는데, 나는 이전에는 yaml를 손수 수정했는데 이부분이 싱크빅하다.
k get svc -n istio-system grafana -o yaml | sed -e "s/type: ClusterIP/type: LoadBalancer/" | kubectl apply -f -
service/grafana configured
k get svc -n istio-system kiali -o yaml | sed -e "s/type: ClusterIP/type: LoadBalancer/" | kubectl apply -f -
service/kiali configured
k get svc -n istio-system tracing -o yaml | sed -e "s/type: ClusterIP/type: LoadBalancer/" | kubectl apply -f -
service/tracing configured
sed 로 수정해서 바로 적용한다. 와우..당연히 내가 못하는건 아닌데 관념의 차이로 인하여 이런 사용을 생각못했다. 다음엔 써먹어야지
ubectl get svc -n istio-system
NAME                   TYPE           CLUSTER-IP      EXTERNAL-IP                                                                    PORT(S)                                                AGE
grafana                LoadBalancer   172.20.162.75   a6d32baedc66b4633bb7fbb0875c6132-465014933.ap-northeast-2.elb.amazonaws.com    3000:30572/TCP                                                3m51s
istio-egressgateway    ClusterIP      172.20.129.21   <none>                                                                         80/TCP,443/TCP                                                21m
istio-ingressgateway   LoadBalancer   172.20.95.93    a0e6177dd9cb64884bd2893028c04328-781274984.ap-northeast-2.elb.amazonaws.com    15021:31227/TCP,80:30590/TCP,443:32395/TCP,31400:32264/TCP,15443:32750/TCP   21m
istiod                 ClusterIP      172.20.90.49    <none>                                                                         15010/TCP,15012/TCP,443/TCP,15014/TCP                                        21m
jaeger-collector       ClusterIP      172.20.99.248   <none>                                                                         14268/TCP,14250/TCP                                                3m51s
kiali                  LoadBalancer   172.20.96.205   a313dbdb158064d578d88c0a022bc845-1007771282.ap-northeast-2.elb.amazonaws.com   20001:30296/TCP,9090:30713/TCP                                               3m51s
prometheus             ClusterIP      172.20.50.6     <none>                                                                         9090/TCP                                                3m50s
tracing                LoadBalancer   172.20.58.118   a9da5b64099ed4fd3b5abdf3b1cd9ebe-68617878.ap-northeast-2.elb.amazonaws.com     80:30295/TCP                                                3m51s
zipkin                 ClusterIP      172.20.76.230   <none>                                                                         9411/TCP                                                3m51s
샘플 manifest 중에 bookinfo 가 있다.
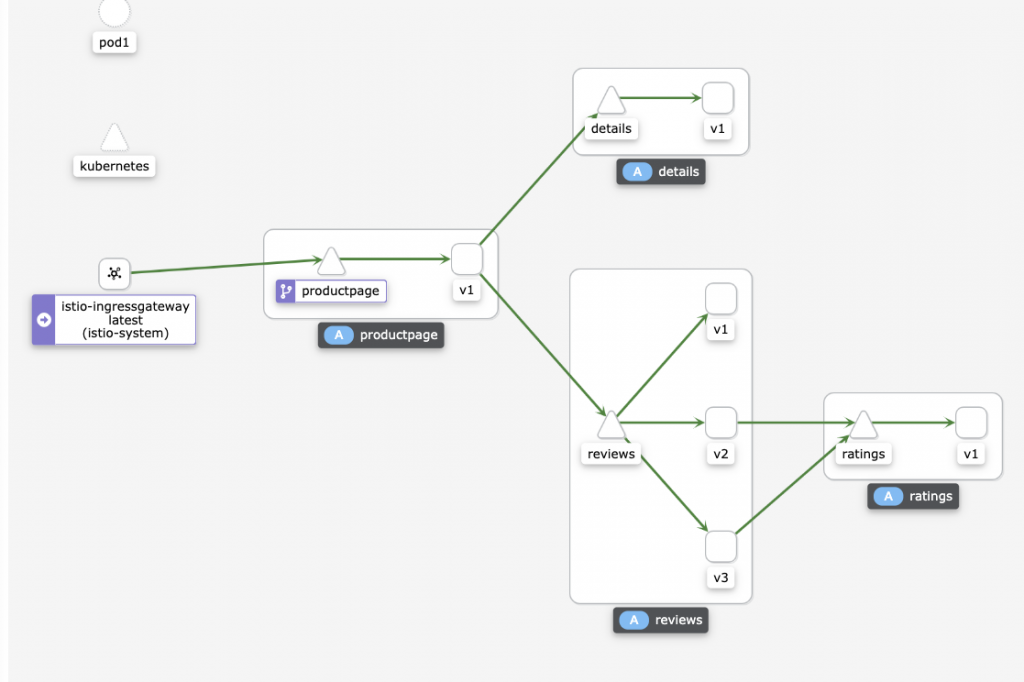
샘플에서 보여주는것은 트래픽이 어떻게 흐르는지 시각화로 보여주는것이다.
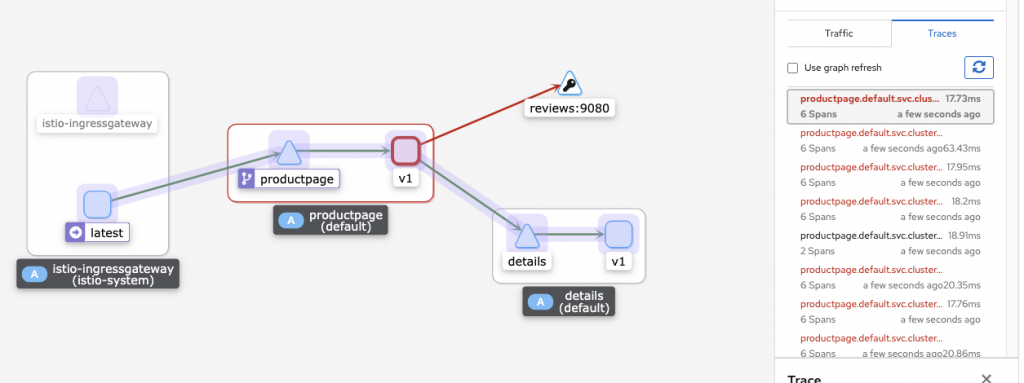
문제가 생길경우 다음과같이 UI 와 로깅으로 확인이 가능하다.
apiVersion: networking.istio.io/v1alpha3
kind: VirtualService
metadata:
  name: reviews
spec:
  hosts:
    - reviews
  http:
  - route:
    - destination:
        host: reviews
        subset: v2
      weight: 50
    - destination:
        host: reviews
        subset: v3
      weight: 50
위의 에러는 기본적인 destination rule 을 설정하지 않은 상태로 review 에 대한 룰을 설정해서 그렇다.
apiVersion: networking.istio.io/v1alpha3
kind: DestinationRule
metadata:
  name: productpage
spec:
  host: productpage
  subsets:
  - name: v1
    labels:
      version: v1
---
apiVersion: networking.istio.io/v1alpha3
kind: DestinationRule
metadata:
  name: reviews
spec:
  host: reviews
  subsets:
  - name: v1
    labels:
      version: v1
  - name: v2
    labels:
      version: v2
  - name: v3
    labels:
      version: v3
---
apiVersion: networking.istio.io/v1alpha3
kind: DestinationRule
metadata:
  name: ratings
spec:
  host: ratings
  subsets:
  - name: v1
    labels:
      version: v1
  - name: v2
    labels:
      version: v2
  - name: v2-mysql
    labels:
      version: v2-mysql
  - name: v2-mysql-vm
    labels:
      version: v2-mysql-vm
---
apiVersion: networking.istio.io/v1alpha3
kind: DestinationRule
metadata:
  name: details
spec:
  host: details
  subsets:
  - name: v1
    labels:
      version: v1
  - name: v2
    labels:
      version: v2
---
destination rule 을 설정하고 보면 reviews rule 이 정상적으로 작동하는것을 알수있다.

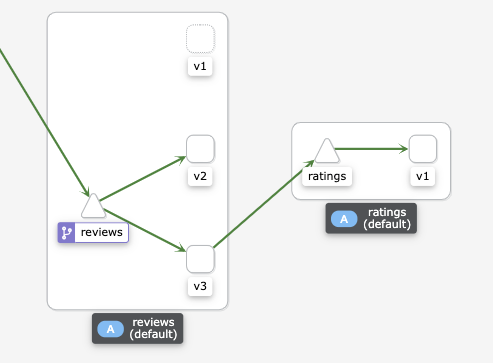
가중치에 의하여 v2/v3로만 라우팅 되는것을 확인할수 있다.
istio는 조만간 블로그에 적용후에 더 자세히 다뤄보도록 하겠다.
좋은 주말되시라!