오늘의 주제는 dynamic cdn / 동적 cloudfront 다.
cloudfront 는 cdn 이다. cdn 이 뭔가?
Contents Delivery Network 컨텐츠를 빠르게 전송하기 위해서 사용자에게 가까운 edge 에서 응답해주는 방식이다. - edge 는 aws에서 말하는 용어이고 보통 pop라고 한다.
많은 지역에 pop이 존재하고 이 pop에선 원본 컨텐츠를 캐싱하여 user에게 전달한다.
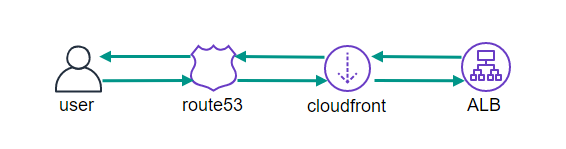
구성도로 보자면 다음과 같다.
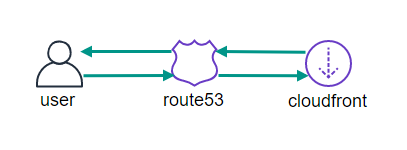
user 가 네임서버에 domain 에대한 확인을 하고 cf의 위치를 알려주면 user는 가장가까운 pop에 연결된다.
간단하게 확인하려면 f12를 눌러서 cloudfront 의 헤더를 확인해 보면 된다.
https://cdn.linuxer.name/test/iu.jpg
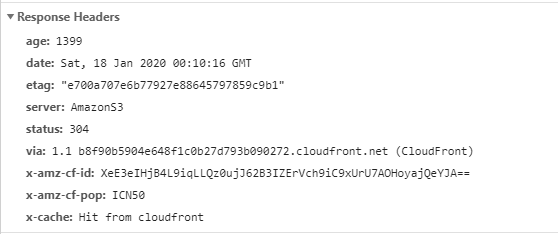
x-amz-cf-pop : ICN50 이부분이 근처의 팝인것이다.
이렇게 정성스럽게 설명하는 이유는 간단하다.
오늘 설정할 부분이 일반적인 CDN의 사용방법이 아니기때문이다.
사이트의 응답속도를 빠르게 하려면 어떻게 해야할까?
많은 방법이 있는데 제일 좋은 방법은 먼저 컨텐츠에 도달하는 속도를 올리는 방법이다. 컨텐츠에 대한 도달속도를 확인하는 방법은 첫번째로
tracert 이다.
테스트하는 도메인의 구성이다.
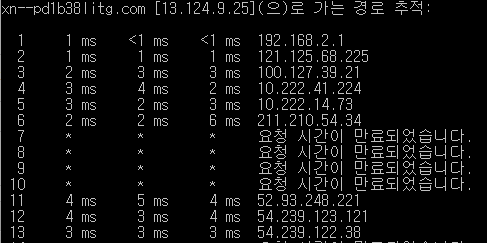
>tracert 리눅서.com
1 1 ms <1 ms <1 ms 192.168.2.1
2 1 ms 1 ms 1 ms 121.125.68.225
3 2 ms 3 ms 3 ms 100.127.39.21
4 3 ms 4 ms 2 ms 10.222.41.224
5 3 ms 2 ms 3 ms 10.222.14.73
6 2 ms 2 ms 6 ms 211.210.54.34
7 * * * 요청 시간이 만료되었습니다.
8 * * * 요청 시간이 만료되었습니다.
9 * * * 요청 시간이 만료되었습니다.
10 * * * 요청 시간이 만료되었습니다.
11 4 ms 5 ms 4 ms 52.93.248.221
12 4 ms 3 ms 4 ms 54.239.123.121
13 3 ms 3 ms 3 ms 54.239.122.38
54.239.122.38 IP는 아마존 IP로 아마존 내 네트워크 까지 연결된것을 확인할수 있었다.
그다음 도메인은 cf에 연결된 도메인이다.
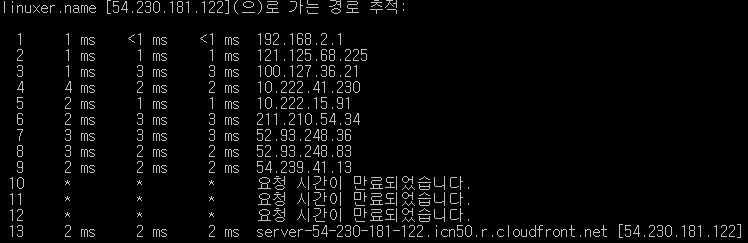
>tracert linuxer.name
1 1 ms <1 ms <1 ms 192.168.2.1
2 1 ms 1 ms 1 ms 121.125.68.225
3 1 ms 3 ms 3 ms 100.127.36.21
4 4 ms 2 ms 2 ms 10.222.41.230
5 2 ms 1 ms 1 ms 10.222.15.91
6 2 ms 3 ms 3 ms 211.210.54.34
7 3 ms 3 ms 3 ms 52.93.248.36
8 3 ms 2 ms 2 ms 52.93.248.83
9 2 ms 2 ms 2 ms 54.239.41.13
10 * * * 요청 시간이 만료되었습니다.
11 * * * 요청 시간이 만료되었습니다.
12 * * * 요청 시간이 만료되었습니다.
13 2 ms 2 ms 2 ms server-54-230-181-122.icn50.r.cloudfront.net [54.230.181.122]
추적을 완료했습니다.
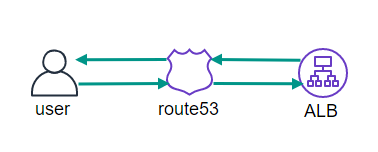
지금 구성에서 linuxer.name 과 리눅서.com 사이트의 동작 자체는 동일하나 리눅서.com은 로드벨런서를 다이렉트로 바라보고 있고 linuxer.name 은 cloudfront 로 연결되어 오리즌을 로드벨런서로 바라보고 있는상태이다.
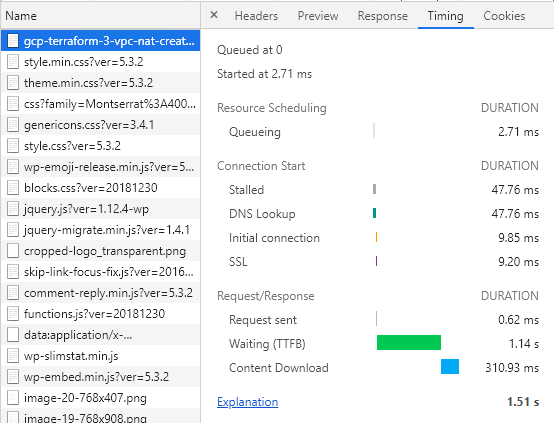
그럼 라우팅은 정상적으로 cloudfront 쪽이 빠른걸 확인했으니 컨텐츠에 대해 접근이 빠른지 확인해 보려면 어떤방법을 사용해야할까? TTFB와 여러지표를 확인하기로 했다. 웹개발자 도구로 timing을 확인하면정확하게 확인할수 있을거라 생각했다.
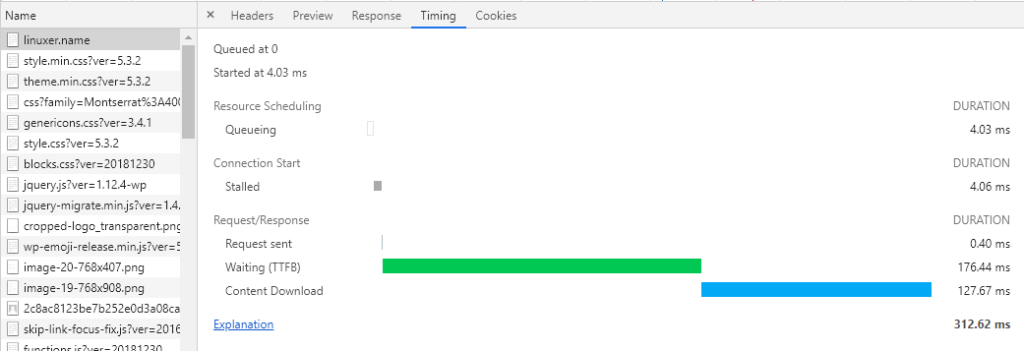
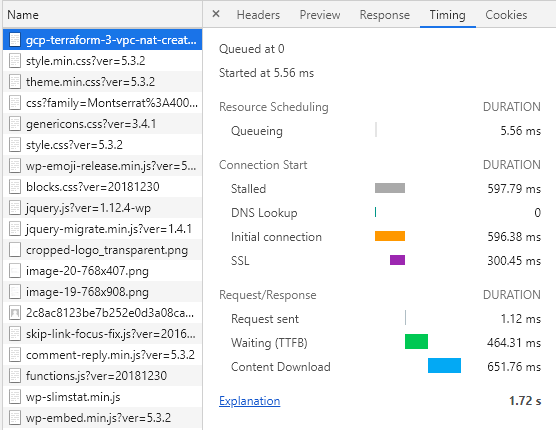
ttfb 가 312.65ms 다 그럼 다이렉트로 로드벨런서에 연결된 도메인은 속도가 얼마나 나올까?
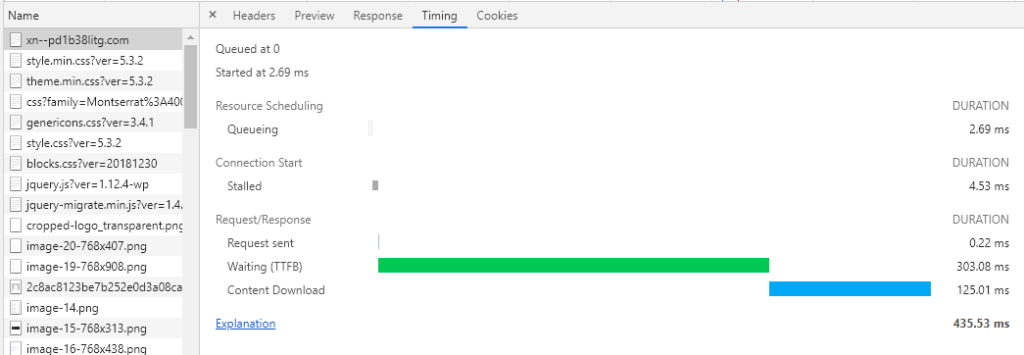
ttfb 가 435.53ms 다. 오잉? 생각보다 속도 차이가 있다.
그럼 일단 더테스트하려면...어쩔까..간단하게 해외로 간다!

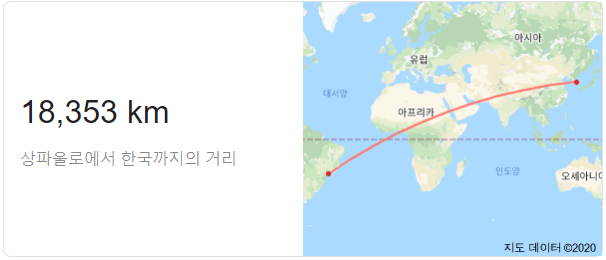
18353km 떨어진 상파울루 리전의 win ec2 이용하여 테스트 하겠다.
cf가 적용되어있는-linuxer.name
cf가 적용되지 않은 리눅서.com
상황에 따른 응답속도의 차이가 있긴하지만 확실히 dynamic cdn 을 적용한 도메인쪽이 좀더 빨리 떳다.
어느정도 유효한 결과를 확인했다는 뜻이다.
물론 내블로그는 가벼우므로..또르륵
https://aws.amazon.com/ko/cloudfront/dynamic-content/
직접 경험해야 하는터라 다하고나니까 문서를 봤다 ㅋㅋㅋ
그래서 이제 어느정도 검증이 끝났고 설정방법이다.
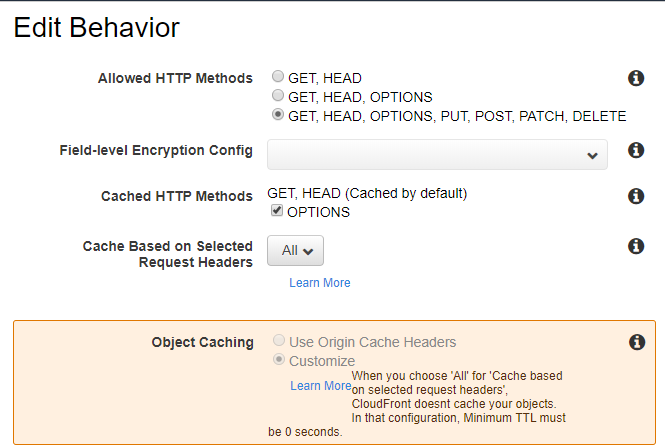
Cache Based on Selected Request Headers -> ALL 로 수정하면 끝이다.
나머지는 자신의 설정대로..잘하면 된다.
끝. 좋은하루 되시라!


