aws-EFS-backup-restore

EFS를 사용하고 백업/복구 이야기를 하려고한다.

EFS는 NFS기반의 편리한 서비스다. aws backup로 스냅샷 방식의 백업이 가능하다.

현재 측정크기가 6.0kib인데

# df -h
Filesystem Size Used Avail Use% Mounted on
devtmpfs 475M 0 475M 0% /dev
tmpfs 492M 0 492M 0% /dev/shm
tmpfs 492M 404K 492M 1% /run
tmpfs 492M 0 492M 0% /sys/fs/cgroup
/dev/xvda1 8.0G 4.6G 3.5G 57% /
tmpfs 99M 0 99M 0% /run/user/0
fs-7eb4fb1f.s.ap-northeast-2.amazonaws.com:/ 8.0E 0 8.0E 0% /mnt/efs

root@ip-10-0-0-12 wordpress]# cd /mnt/efs
# du --max-depth=1 -h
258M ./ftp
258M .

실제론 그렇지 않다. 일정 GB이상의 데이터가 쌓여야 명령어가아닌 gui에서 확인할수 있다.

오늘은 이 파일시스템을 백업할거다.

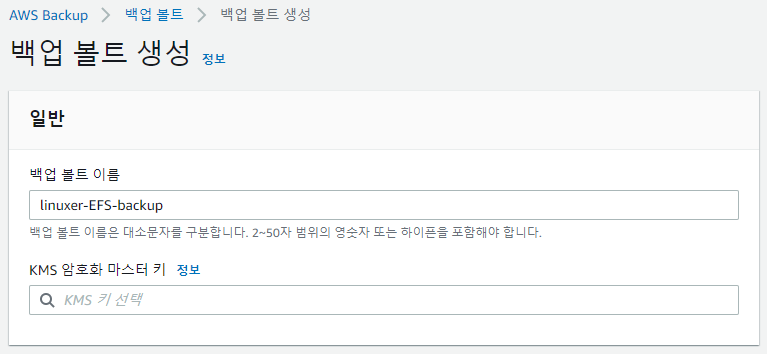
aws backup를 사용할때 유의할점은 백업볼트를 생성할때 각각 목적에 맞게 분할해서 사용하라는 거다. 급하게 작업하다가 관리가 너무 불편해져서 결국 나눴다.

일반적으론 볼트생성->계획생성->규칙생성->리소스할당 순서다.

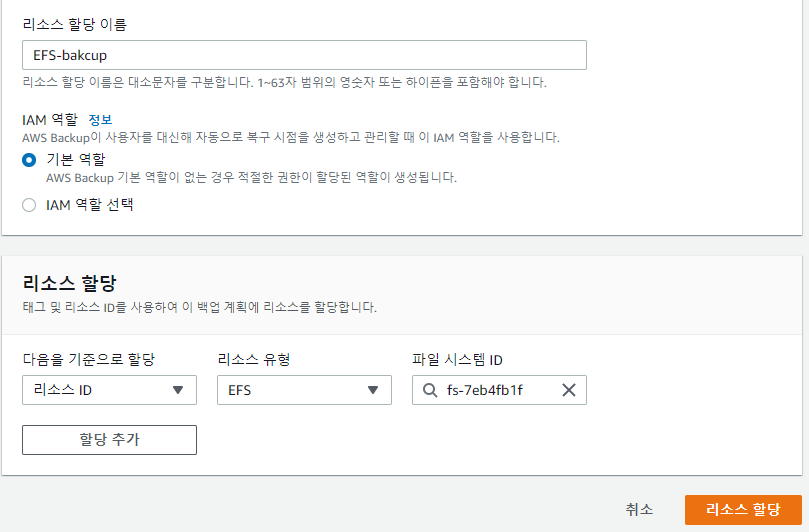
리소스할당은 tag 기반으로도 가능하고 리소스ID 유형으로도 가능하다.

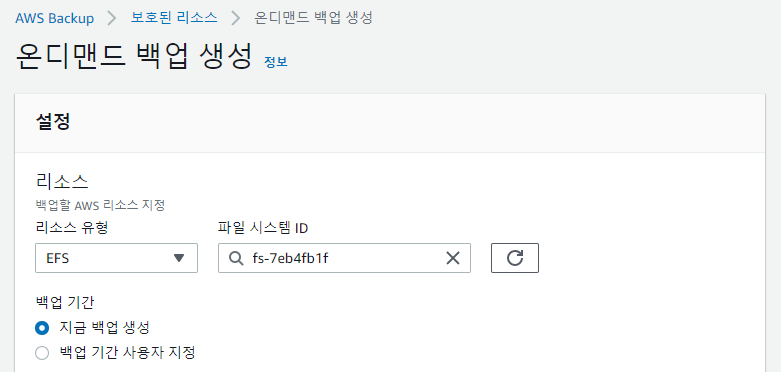
여기까지 백업계획을 이용한 스케줄 백업이었고 단발성 백업은 대시보드에서 온디멘드 백업으로 진행하면 된다.

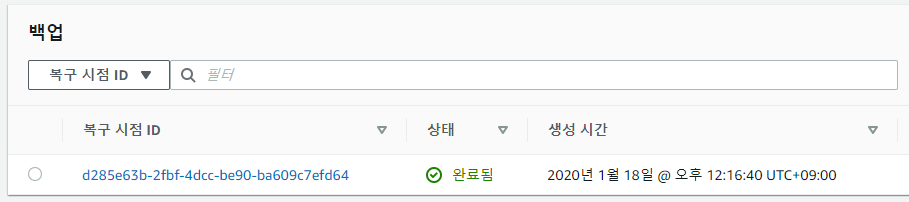
진행중인 jab는 작업부분에서 확인할수 있다.

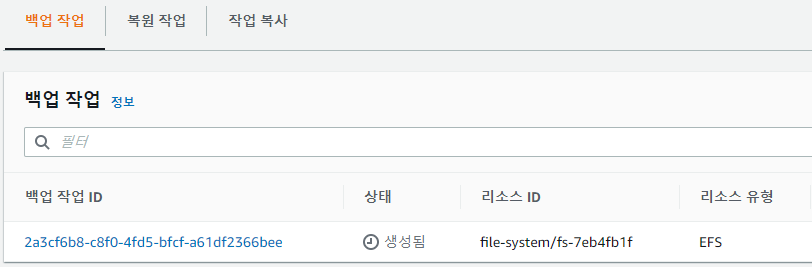
용량이 작어서 금방 백업이 완료됬다.

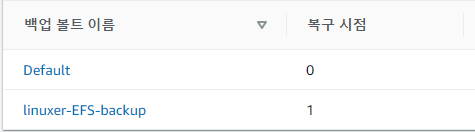
백업은 증분방식이고 복구지점에 카운트가 올라간다.

복원을 진행해 보면

전체/부분/소스/새 이렇게 선택지가 나눠지는데 얼마전 나에게 혼란을 줬던 부분은 전체-소스 파일 시스템에 복원이다.

복원을 누르면 작업탭에 복원에서 확인할수 있다.

Pending-> Running -> Completed 단계를 거친다.

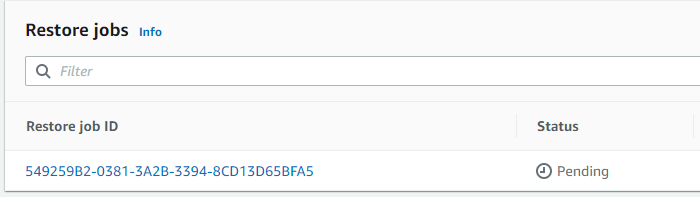
Pending 이 한국어 에선 보류중으로 나오는데 처음에 좀 당황했다.
보류...??????????????????????????????????????????????
하고 Pending 좀 오래걸린다. 거의 10분 이상걸린적도있다.

root@ip-10-0-0-12 ~]# cd /mnt/efs/
root@ip-10-0-0-12 efs]# ll
total 16
drwxr-xr-x 4 root root 6144 Jan 18 11:24 aws-backup-restore_2020-01-18T03-33-30-039Z
drwxr-xr-x 4 root root 6144 Jan 18 11:24 aws-backup-restore_2020-01-18T03-47-22-912Z
drwxr-xr-x 4 root root 6144 Jan 18 11:24 aws-backup-restore_2020-01-18T03-49-03-261Z
drwxr-xr-x 3 jth-ftp jth-ftp 6144 Aug 21 21:20 jth-ftp

aws-backup-restore_2020-01-18T03-33-30-039Z 같은 형식으로 복원 시작시간으로 디렉토리가 생성되고 복원이 된다. 당연히 복원되는 양에 따라서 속도도 다르다.

3번 복원을해서 3개의 디렉토리가 추가 생성된거다. 사용용량이 df 로는 안보이지만 aws 콘솔에선 보인다.

처음 복구할 땐 덮어쓰기로 생각해서 한참을 기다려도 복구가 안되는거같아 EFS의 /를 마운트 해보고서야 알았다. 아 디렉토리 생성 후 복구되는구나.

그래서 이제 추가로 파일 복구를 해보기로 했다.

root@ip-10-0-0-12 wp-admin]# pwd
/mnt/efs/jth-ftp/wordpress/wp-admin
root@ip-10-0-0-12 wp-admin]# ll
total 980

/mnt/efs/jth-ftp/wordpress/wp-admin 디렉토리를 복구해보겠다.

부분 복원으로 선택하고~ 작업은 부분복원이 좀더 걸리는거 같았다.

/mnt/efs/aws-backup-restore_2020-01-18T04-09-39-782Z/jth-ftp/wordpress/wp-admin

경로로 이동해서 복구 확인해봤다.

root@ip-10-0-0-12 wp-admin]# ll
total 980

정상적으로 잘복구 된것을 확인할수 있었다.

efs 를 매우 애용하는 입장에서 파일복구가 가능해진것은 매우 반길 일이다.

아 추가로 EFS 에서 Bursting 모드를 사용할경우 BurstCreditBalance 를 가지게 되고 사용시 소모가 된다. 그런데 백업이나 복구시에는 크레딧을 따로 소모하지 않았다.

읽어주셔서 감사하다!

aws-dynamic-cloudfront

오늘의 주제는 dynamic cdn / 동적 cloudfront 다.

cloudfront 는 cdn 이다. cdn 이 뭔가?

Contents Delivery Network 컨텐츠를 빠르게 전송하기 위해서 사용자에게 가까운 edge 에서 응답해주는 방식이다. - edge 는 aws에서 말하는 용어이고 보통 pop라고 한다.

많은 지역에 pop이 존재하고 이 pop에선 원본 컨텐츠를 캐싱하여 user에게 전달한다.

구성도로 보자면 다음과 같다.

user 가 네임서버에 domain 에대한 확인을 하고 cf의 위치를 알려주면 user는 가장가까운 pop에 연결된다.

간단하게 확인하려면 f12를 눌러서 cloudfront 의 헤더를 확인해 보면 된다.

https://cdn.linuxer.name/test/iu.jpg

x-amz-cf-pop : ICN50 이부분이 근처의 팝인것이다.

이렇게 정성스럽게 설명하는 이유는 간단하다.

오늘 설정할 부분이 일반적인 CDN의 사용방법이 아니기때문이다.

사이트의 응답속도를 빠르게 하려면 어떻게 해야할까?

많은 방법이 있는데 제일 좋은 방법은 먼저 컨텐츠에 도달하는 속도를 올리는 방법이다. 컨텐츠에 대한 도달속도를 확인하는 방법은 첫번째로

tracert 이다.

테스트하는 도메인의 구성이다.

>tracert 리눅서.com
1 1 ms <1 ms <1 ms 192.168.2.1
2 1 ms 1 ms 1 ms 121.125.68.225
3 2 ms 3 ms 3 ms 100.127.39.21
4 3 ms 4 ms 2 ms 10.222.41.224
5 3 ms 2 ms 3 ms 10.222.14.73
6 2 ms 2 ms 6 ms 211.210.54.34
7 * * * 요청 시간이 만료되었습니다.
8 * * * 요청 시간이 만료되었습니다.
9 * * * 요청 시간이 만료되었습니다.
10 * * * 요청 시간이 만료되었습니다.
11 4 ms 5 ms 4 ms 52.93.248.221
12 4 ms 3 ms 4 ms 54.239.123.121
13 3 ms 3 ms 3 ms 54.239.122.38

54.239.122.38 IP는 아마존 IP로 아마존 내 네트워크 까지 연결된것을 확인할수 있었다.

그다음 도메인은 cf에 연결된 도메인이다.

>tracert linuxer.name
1 1 ms <1 ms <1 ms 192.168.2.1
2 1 ms 1 ms 1 ms 121.125.68.225
3 1 ms 3 ms 3 ms 100.127.36.21
4 4 ms 2 ms 2 ms 10.222.41.230
5 2 ms 1 ms 1 ms 10.222.15.91
6 2 ms 3 ms 3 ms 211.210.54.34
7 3 ms 3 ms 3 ms 52.93.248.36
8 3 ms 2 ms 2 ms 52.93.248.83
9 2 ms 2 ms 2 ms 54.239.41.13
10 * * * 요청 시간이 만료되었습니다.
11 * * * 요청 시간이 만료되었습니다.
12 * * * 요청 시간이 만료되었습니다.
13 2 ms 2 ms 2 ms server-54-230-181-122.icn50.r.cloudfront.net [54.230.181.122]
추적을 완료했습니다.

지금 구성에서 linuxer.name 과 리눅서.com 사이트의 동작 자체는 동일하나 리눅서.com은 로드벨런서를 다이렉트로 바라보고 있고 linuxer.name 은 cloudfront 로 연결되어 오리즌을 로드벨런서로 바라보고 있는상태이다.

그럼 라우팅은 정상적으로 cloudfront 쪽이 빠른걸 확인했으니 컨텐츠에 대해 접근이 빠른지 확인해 보려면 어떤방법을 사용해야할까? TTFB와 여러지표를 확인하기로 했다. 웹개발자 도구로 timing을 확인하면정확하게 확인할수 있을거라 생각했다.

ttfb 가 312.65ms 다 그럼 다이렉트로 로드벨런서에 연결된 도메인은 속도가 얼마나 나올까?

ttfb 가 435.53ms 다. 오잉? 생각보다 속도 차이가 있다.

그럼 일단 더테스트하려면...어쩔까..간단하게 해외로 간다!

18353km 떨어진 상파울루 리전의 win ec2 이용하여 테스트 하겠다.

cf가 적용되어있는-linuxer.name

cf가 적용되지 않은 리눅서.com

상황에 따른 응답속도의 차이가 있긴하지만 확실히 dynamic cdn 을 적용한 도메인쪽이 좀더 빨리 떳다.

어느정도 유효한 결과를 확인했다는 뜻이다.

물론 내블로그는 가벼우므로..또르륵

https://aws.amazon.com/ko/cloudfront/dynamic-content/

https://aws.amazon.com/ko/blogs/korea/how-to-improve-dynamic-contents-delievery-using-amazon-cloudfront/

직접 경험해야 하는터라 다하고나니까 문서를 봤다 ㅋㅋㅋ

그래서 이제 어느정도 검증이 끝났고 설정방법이다.

Cache Based on Selected Request Headers -> ALL 로 수정하면 끝이다.

나머지는 자신의 설정대로..잘하면 된다.

끝. 좋은하루 되시라!

gcp terraform-3 vpc-nat create

vpc-nat 를 연결하기로 했다.
어젠 subnet 을 만들었고 오늘은 망분리 환경을 구성하기 위해 nat 를 넣었다.

main.tf

resource "google_compute_subnetwork" "us-central1-subnet" {
name = "${local.name_suffix}-us-central1-subnet"
ip_cidr_range = "10.2.0.0/16"
region = "us-central1"
network = "${google_compute_network.vpc.self_link}"
}
resource "google_compute_router" "us-central1-router" {
name = "${local.name_suffix}-us-central1-router"
region = google_compute_subnetwork.us-central1-subnet.region
network = google_compute_network.vpc.self_link
}
resource "google_compute_address" "address" {
count = 2
name = "${local.name_suffix}-nat-manual-ip-${count.index}"
region = google_compute_subnetwork.us-central1-subnet.region
}
resource "google_compute_router_nat" "nat_manual" {
name = "${local.name_suffix}-us-central1-router-nat"
router = google_compute_router.us-central1-router.name
region = google_compute_router.us-central1-router.region
nat_ip_allocate_option = "MANUAL_ONLY"
nat_ips = google_compute_address.address.*.self_link

source_subnetwork_ip_ranges_to_nat = "LIST_OF_SUBNETWORKS"
subnetwork {
name = "${local.name_suffix}-us-central1-subnet"
source_ip_ranges_to_nat = ["10.2.0.0/16"]
}
}

resource "google_compute_network" "vpc" {
name = "${local.name_suffix}-vpc"
auto_create_subnetworks = false
}

backing_file.tf

locals {
name_suffix = “linuxer”
}
provider “google” {
region = “us-central1”
zone = “us-central1-c”
}

vpc 와 nat nat route 까지 정상적으로 만들어져서 동작하는 것을 확인할 수 있었다.

리전당 nat는 1개를 꼭만들어야 했다.

현재 생성한 tf는 subnet 하나에 대한 설정이다. 다른 리전으로도 네임만 수정을 적절히 하면 수정해서 쓸수 있다.

gcp-cloud shell 초기화

gcloud config list 를 확인하게되면 가끔 꼬인다.....................여러 어카운트를 가지고 관리할때 진짜 복잡해 지는데.... 이때에 필요한기능이다.

cloud shell 을 초기화해서 꼬인 연결을 초기화 해준다.

문제가 될때 초기화 하자

gcp- Google Kubernetes Engine

https://cloud.google.com/kubernetes-engine/docs/quickstart?hl=ko

먼저 cloud shell 에서 프로젝트 지정하고 리전(아님)을 지정한다. - 수정- zone 을 지정한다.

linuxer@cloudshell:~ (elated-ranger-263505)$ gcloud config set compute/zone us-central1-a
Updated property [compute/zone].

그리고 컨테이너 클러스터를 생성한다.

linuxer@cloudshell:~ (elated-ranger-263505)$ gcloud container clusters create linuxer-k8s

WARNING: Currently VPC-native is not the default mode during cluster creation. In the future, this will become the default mode and can be disabled using --no-enable-ip-ali as flag. Use --[no-]enable-ip-alias flag to suppress this warning.
WARNING: Newly created clusters and node-pools will have node auto-upgrade enabled by default. This can be disabled using the --no-enable-autoupgrade flag.
WARNING: Starting in 1.12, default node pools in new clusters will have their legacy Compute Engine instance metadata endpoints disabled by default. To create a cluster with
legacy instance metadata endpoints disabled in the default node pool, run clusters create with the flag --metadata disable-legacy-endpoints=true.
WARNING: Your Pod address range (--cluster-ipv4-cidr) can accommodate at most 1008 node(s).
This will enable the autorepair feature for nodes. Please see https://cloud.google.com/kubernetes-engine/docs/node-auto-repair for more information on node autorepairs.
ERROR: (gcloud.container.clusters.create) ResponseError: code=403, message=Kubernetes Engine API is not enabled for this project. Please ensure it is enabled in Google Cloud
Console and try again: visit https://console.cloud.google.com/apis/api/container.googleapis.com/overview?project=elated-ranger-26 to do so.

api error 는 역시나 사이트로 이동해서 허용해준다.

zone 을 지정하지 않고 리전을 자꾸 지정해서 클러스터를 생성할 수 없었다.

서태호님께서 잘못된 부분을 알려주셨다. 덕분에 진행할수 있었다.ㅜㅜ다행

gcloud container clusters get-credentials linuxer-k8s@cloudshell:~ (jth3434-197516)$ gcloud config set compute/zone us-central1-a

정상적으로 클러스터를 생성하고

@cloudshell:~ (jth3434-197516)$ gcloud container clusters get-credentials linuxer-k8s

클러스터 사용자 인증하고~

https://github.com/GoogleCloudPlatform/kubernetes-engine-samples/tree/master/hello-app

URL 참고하시고 hello-app 으로 deployment 한다.

@cloudshell:~/hello-app (jth3434-197516)$ kubectl create deployment hello-server --image=gcr.io/google-samples/hello-app:1.0

hello-app ver 1.0 이다. dockerfile 을 확인하면 컨테이너 설정을 확인할수 있다.

kubectl expose 를 이용하여 생성한 파일을 노출한다.

@cloudshell:~/hello-app (jth3434-197516)$ kubectl get pods
NAME READY STATUS RESTARTS AGE
hello-server-64db4d4dc7-xtrcd 1/1 Running 0 12m
@cloudshell:~/hello-app (jth3434-197516)$ kubectl get service hello-server
NAME TYPE CLUSTER-IP EXTERNAL-IP PORT(S) AGE
hello-server LoadBalancer 10.35.255.80 35.223.145.93 80:30201/TCP 5m30s

그리고 get pads 으로 pads 의 상태를 확인하고 서비스를 확인해서 정상적으로 external-ip로 접속했을때 접속이 되면 정상이다.